Here’s to Love with Verdant Garden

Greetings my stamping friends. I hope everything is well with you. Where did the week go?

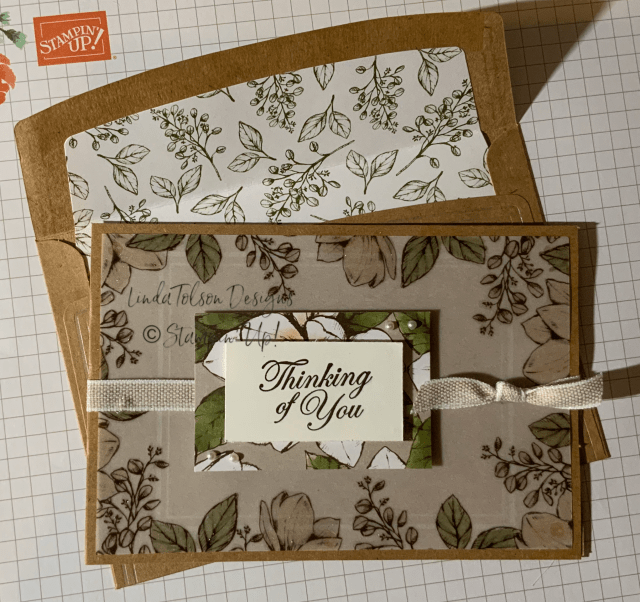
Today’s project share uses a product suite that retires with the end of the 2019-2020 Annual Catalog — Garden Lane. (I have to confess that I used retired ribbon — Shimmer Ribbon in Pear Pizzazz — because believe it or not I did not have a color that matched my card!)

I have used a new technique in the design of this card called the “Scrappy Strip”. This was designed by a crafter in Australia, Bruno Bertucci. He has a video on YouTube that walks you through the process, but I shortened the labor a bit. Rather than making my cardstock piece larger and then cutting it down after all the strips are attached, I used the standard mat size of 4.00” x 5.25” and just trimmed off the excess ends as I assembled the pieces.

I started with two different designs of my DSP cut at 4.25” x 12.00”. Being a little OCD, rather than cutting varying strips, I put one corner of the DSP on the .50” mark and the other on the .75” mark on my trimmer and cut and alternated the tips so that the paper did not get too angled in any one direction. For the size mat I used, I needed four cuts of each design (for a total of eight strips). When assembling, you just need for you starting edge to be straight. I used two pieces from one design, flipping the second piece over, and then used two pieces From the second design, repeating this process until the cardstock is covered. I left about 1/8” space between each strip. Your last strip will be wider than the cardstock, don’t worry. When done attaching the strips, turn the piece over and cut off the excess pieces with your snips. Super easy, I swear!

Here are the Stampin’ Up! products that I used in the design of this card with the handy hyperlinks that will add them to your shopping cart with just a couple of clicks:

Product List

As a reminder, the stamp set, designer series paper and the punch used in this project RETIRE June 2, 2020 and are only available while supplies last.

If you have any questions on any of the design elements of this card please ask me.

Thank you for stopping by today, I hope you leave here inspired to put stamps to ink to paper. Until next time, stamp on my friends.

Linda

#acardaday
#makeacardsendacard
#keepstamping

Posted in Any Occassion, Cards, Techniques | Tagged , , | Leave a comment

Peaceful Moments with Peaceful Poppies DSP

Greetings my stamping friends. I hope you all are doing well and staying safe as each state begins to reopen for business. My husband and I had a date night at our neighborhood Sonic where we ate our meal in his truck. I have to say it was nice to get out of the house, even if just for 30 minutes. We then spent time out in our backyard with our fur babies until the sun began to set. It’s the little things, right!

The projects I am sharing with you today are quick and easy using the designer series paper as the main focus. For me, the perfect designer series paper is Peaceful Poppies which will be among the products that will retire June 2, 2020 (available only while supplies last). I used just one sheet of the 12 x 12 paper to make all six cards:

What do you think? To me they are amazing with very little effort. The most tedious part was putting the sequins on glue dots (add them to the roll of glue dots and transfer them with your Take Your Pick Tool).

You will need to cut two of the scallop pieces and will have a little excess that you will trim. I would add the scallop pieces before you attach the DSP to the card base.

Here are the Stampin’ Up! products that I used in the design of these cards:

Product List

If you have any questions regarding any of the design elements of these cards please ask.

RETIRING ITEMS LISTS

I posted earlier today regarding the items that will be retiring from both the 2019-2020 Annual Catalog and the 2020 January-June Mini Catalog. As a rule, almost all designer series papers are retired, as well as embellishments and of course the 2018-2020 In Color collection (ink pads, refills, markers, paper, embellishments, including ribbons. These items are always the first to sell out. If you have favorites order them now to increase your odds of getting what you want.

To clarify the reason the Stampin’ Blends (alcohol markers) are on the list — they are not being discontinued. Rather they will no longer be offered as singles (light or dark separately). Starting with the 2020-2021 Annual Catalog, they will be sold as a combo set. They will be given new product numbers, but the colors and designs are not changing. If you have either a light or dark Blends that you need to replace for lack of ink, stock up on what you need now while you can order them separately.

All good things must come to an end—like favorite products. Today we’re announcing that on June 2, SNAIL Adhesive is retiring from our product line. But don’t worry! On June 3 we’re replacing it with something that we think you’ll like even better. I will have more information to share with you on May 26.

FREE GIFT ANYONE? Anyone who places an order through my online store of at least $50.00 before shipping and taxes will receive a card and a surprise embellishment or adhesive in the mail from me. Just a token of my appreciation for selecting me as your demonstrator.

Thank you for stopping by today. I hope you leave here inspired to put stamps to ink to paper. Until next time, stamp on my friends.

Linda

#acardaday
#makeacardsendacard
#keepstamping

Posted in Any Occassion, Birthday, Cards, Sympathy, Thank You | Tagged , , | Leave a comment

Retired Items Lists

Greetings my stamping friends. The lists of products being retired from the 2019-2020 Annual Catalog and the January-June 2020 Mini Catalog have been released by Stampin’ Up!

If you are not familiar with the retired lists, they identify each product that is being discontinued, no longer will be offered as a bundle or are being reconfigured for the upcoming 2020-2021 Annual Catalog.

Some of your favorite items may be on these lists so be sure to place your order ASAP. These items will only be available WHILE SUPPLIES LAST through June 2, 2020.

You can download the Retired List for the 2019-2020 Annual Catalog by clicking on the “download” button:

You can download the Retired List for the 2020 January-June Mini Catalog by clicking on the “download” button:

If either link doesn’t work for you, please let me know.

I will have more to share with you soon so stay tuned.

Thank you for stopping by. Until next time, stamp on my friends.

Linda

Posted in Products, Retired / Clearance Rack Items | Leave a comment

Best Dressed Happy Mother’s Day with Timeless Tulips

Greetings my stamping friends. I did not post yesterday (obviously) due to a horrible headache followed by a fever. I have to admit I was a little scared when the thermometer registered 100.0, but thankfully it was back down to 98.4 this morning. I hope you all are doing well.

I had actually finished today’s project to share with you last night, but my eyes felt like flames were shooting from them due to the fever. You will notice that I used one of the design layouts from day 1 of my Double Wonder series. I hope you like it.

While Stampin’ Up! makes it easy to pick your supplies for projects by offering them in product suites, you are not limited to just those products in the suite. I used three products from three different product suites for this project. What I love most about the products from Stampin’ Up! (other than their high quality) is how easy they coordinate with each other.

Here are the Stampin’ Up! products that I used in the design of this card along with the nifty hyperlinks that allow you to add them to your shopping cart with just a click:

Product List

If you have any questions regarding any of the design elements of this card, please ask.

Thank you for stopping by today. I hope you leave here inspired to put stamps to ink to paper. Until next time, stamp on my friends.

Linda

#acardaday
#makeacardsendacard
#keepstamping

Posted in Cards, Mother's Day | Tagged , , | Leave a comment

Double Wonder / One Sheet Wonder – Part 3

Greetings my stamping friends! I hope you are doing well. If you have gotten crafty over this past week or weekend, I would love to see what you are working on. Feel free to send me your projects by email and let me know if you approve my sharing them here for all to see.

We have made it through another day of shelter in place. Texas is going to start a slow reopening of business and public spaces starting this coming week which is a bit frightening. Since I am immune compromised, I for one will remain in quarantine and see how this all plays out in the coming weeks.

Today’s project share wraps up the three part series of Double Wonder. We will make three cards starting with the remaining 3.50″ x 6″ pieces of DSP as well as the 4″ x .75″ pieces from part 2 I shared with you yesterday. Cut the 3.50″ x 6″ pieces into two 3.50″ x 2.25″ pieces for a total of four pieces. You will use two pieces per card. You will then have two pieces that remain that each measure 3.50″ x 1.50″. Cut these pieces in half so that the pieces measure 1.75″ x 1.50″ for a total of four pieces. You will use all four pieces on one card.

Once we assemble all of the parts for the cards, they will look something like these:

As with yesterday’s cards, I used basically the same supplies, but changed my card base cardstock color, ribbon and an embellishment. Now, if I had used two different patterned pieces for my starting 6″ x 12″ pieces, I would have been able to make more pattern layout variations, including using opposite patterns on the top and bottom of the two similar cards in today’s post.

Here are the Stampin’ Up! products that I used in the design of these cards along with the helpful hyperlinks so you can add these items to your shopping cart quickly:

Product List

If you have any questions regarding any of the design elements of these cards, again just ask.

Now I need to plan what I will share with you in the coming days. If you have something special that you would like me to share with you – either a technique or a particular product suite or stamp set – assuming I have what I need, I would be happy to create something for you.

Thank you for stopping by today. I hope you leave here inspired to put stamps to ink to paper. Until next time, stamp on my friends.

Linda

#acardaday
#makeacardsendacard
#keepstamping

Posted in Any Occassion, Cards, Thank You | Tagged , , , | Leave a comment

Double Wonder / One Sheet Wonder – Part 2

Greetings my stamping friends. Thank goodness for weekends! Not that my days are much different right now and I am sure the same applies to you. I hope you are all still safe and healthy as we ride out this pandemic.

I am continuing my Double Wonder, One Sheet Wonder series with you today with the second group of four cards, using basically the same supplies and altering layouts as I used in part 1.

Starting with the 7.50″ x 6″ pieces of DSP, cut down to 4″ x 6″ and set aside the remaining 3.50″ x 6″ pieces for the next projects. Cut .75″ off the bottom of the 4″ x 6″ piece of DSP which will leave you with pieces that measure 4″ x 5.25″ and 4″ x .75″. Set aside the 4″ x .75″ pieces for the next projects. Next cut the 4″ x 5.25″ pieces into four pieces that measure 1″ x 5.25″. You should have a total of eight pieces that measure 1″ x 5.25″. You will use two pieces per card.

Cut coordinating cardstock for four card bases measuring 8.50″ x 5.50″. Score each card base at 4.25″ and 1.25″ from one end which will be the front of your card. I scored at 4.25″ and then flipped the paper over before scoring at 1.25″ so that my “mountains” and “valleys” of the folds would be on the correct sides. (TIP: Valleys are on the outside of the fold, with the mountains on the inside of the fold – this keeps your cardstock from cracking when you fold it.)

The 1.25″ scored piece will fold back towards the spine of the card so that a portion of the inside of the card is exposed. (I adhered my 1.25″ flaps for the card front to keep them in place. This step is optional.) I then attached a piece of DSP in the folded flap area as well as on the inside of the card at the right side.

Once all the pieces are assembled and embellishments have been added, your cards will look something like this:

Here are the Stampin’ Up! products that I used in the design of these cards with the nice hyperlinks that will allow you to quickly add these products to your shopping cart.

Product List

As I mentioned earlier in my post, these are basically the same products I used in yesterday’s cards, except I changed the ribbon and added pearls.

If you have any questions regarding any of the design elements of these cards, please ask.

Thank you for stopping by today. I hope you leave here inspired to put stamps to ink to paper. Until next time, stamp on my friends.

Linda

#acardaday
#makeacardsendacard
#keepstamping

Posted in Any Occassion, Cards, Thank You | Tagged , , , | Leave a comment

Double Wonder / One Sheet Wonder

Greetings my stamping friends. I hope you are all doing well and that you are taking time out of your day or week to do a little bit of stamping. For me, getting my fingers on stamps, inks and paper is the best therapy.

With today’s project share, I am starting a three-part series on how you can create a “Double Wonder” from one sheet of 12″ x 12″ piece of designer series paper. This can also be called a “One Sheet Wonder” but instead of starting with cutting on the piece of 12″ x 12″ paper, we are going to cut it to 6″ x 12″ and then cut both pieces the same dimensions. When all is said and done, we will have created 11 cards with the one piece of 12″ x 12″ DSP!

For today’s cuts, we are going to take the 6″ x 12″ pieces and cut off 4.50″ so that you end up with a 4.50″ x 6″ piece (x 2 since we are going to cut both pieces the same). Then cut the 4.50″ x 6″ pieces to 1.50″ x 6″ and you should now have six pieces. Next, cut the 1.50″ x 6″ to 1.50″ x 3″. You should now have 12 pieces that measure 1.50″ x 3″. You will use three pieces for each card and will make four cards. (Set aside the remaining two 7.50″ x 6″ pieces for later.) You will want to cut a standard A2 card base (8.50″ x 5.50″, scored at 4.25″) (x4). Cut a mat that measures 3.25″ x 5″ (x4) in a coordinating color of cardstock.

This is what you will end up with once you have assembled all of the parts:

By changing the punch and which side of the pieces of DSP I used, I created four different, but similar cards. (NOTE: We will use the same sentiments and punches for each group of cards we make, so if you want to get a head start, stamp three of each and punch.)

Here are the Stampin’ Up! supplies that I used in the design of these cards with hyperlinks for you to easily add them to your shopping cart:

Product List

If you have any questions on any of the design elements of this card, do not hesitate to contact me.

Retiring Items

On April 22 at 1:00 pm (MT), Stampin’ Up! will post the retiring product lists for the January–June 2020 Mini Catalog and 2019–2020 Annual Catalog. These last-chance products will be available until June 2 or while supplies last only, so check my blog for more information. And remember—retiring items sell fast. Get your favorites before they’re gone!

Some items that I know will retire are the 2018-2020 In Colors.

If these are among your favorite colors, be sure to place your order now because these items are among the first to sell out.

Thank you for stopping by today. I hope you leave here inspired to put stamps to ink to paper. Until next time, stamp on my friends.

Linda

#acardaday
#makeacardsendacard
#keepstamping

Posted in Any Occassion, Cards, Double Wonder, One Sheet Wonder, Thank You | Tagged , , , | Leave a comment

Thinking of You with Magnolia Lane

Greetings once again my stamping friends. I hope this post finds you healthy and happy.

Today’s project is a quick and easy card (if you elect not to color the vellum paper as I did) and uses four of the products from the Magnolia Lane Suite in the 2019-2020 Annual Catalog. I would love to hear from you what you think about this project and this suite in general.

The piece of vellum is included in the Memories & More card pack that is part of this product suite. I colored on the back side of the sheet with Stampin’ Blends and then on the front with Wink of Stella. I cut one of the 4″ x 6″ cards from the same card pack and cut it down to 2″ x 3″ and used it as a mat for the sentiment which is stamped onto a piece of 1.25″ x 2.25″ of whisper white cardstock with dimensionals. The layered piece is then attached to the card front with dimensionals.

Here are the Stampin’ Up! products that I used in the design of this card with the hyperlinks to allow you to easily add these items to your shopping cart:

Product List

If you have any questions regarding any of the design elements of this card, just ask.

Thank you for stopping by today. I hope you leave here inspired to put stamps to ink to paper. Until next time, stamp on my friends.

Linda

#acardaday
#makeacardsendacard
#keepstamping

Posted in Any Occassion, Cards, Memories & More, Products | Tagged , | Leave a comment

Clearance Rack Refresh!

Greetings my stamping friends. I am posting a quick update on the Clearance Rack.

New items have been added to the Clearance Rack in the online store! If you didn’t visit this page after receiving my most recent post regarding the Everything is Rosie product medley, be sure to check it out ASAP. Supplies are limited, and with discounts up to 60%, products will go quickly.

You can visit the Clearance Rack HERE.

I will be back later with a project to share with you.

Until next time, stamp on my friends.

Linda

Posted in Clearance Rack, Products | Leave a comment

Everything is Rosie

Greetings my stamping friends. I hope you are all doing well.

I have spent most of my day attempting to organize/reorganize my crafting space. There’s nothing quite as sweet as a work surface that has been cleaned and everything (almost everything) has been put in its proper place!

Today’s project shares with you a product medley that was offered as a special release in late 2019 – Everything is Rosie. Why am I sharing a project using these products, you ask? Well, the simple and obvious answer is because this product medley is still available on the CLEANCE RACK at a greatly discounted price. I was inspired by a card I found on Pinterest by Susan LaCroix which I modified slightly.

My three layered strips of DSP are cut using one of the dies from the rectangles set and measure approximately 1.25″ x 3.25″. I cut the gold DSP from this product medley at 1.50″ x 3.50″ and attached flat to card front. With the exception of the Night of Navy card base, Night of Navy ink, adhesives and the rectangle die, everything else used in the design of this card is included in the product medley, including the stamp set.

Here are the Stampin’ Up! products that were used in this design of this card with hyperlinks that will allow you to add these products to your shopping cart with ease:

Product List

If you have any questions regarding any design element of this card, do not hesitate to contact me.

Speaking of the CLEARANCE RACK, be sure to check it out for deep discounts on Stampin’ Up! products that may have been retired or were limited time offers in the past. You never know what you might find!

Thank you for stopping by today. I hope you leave here inspired to put stamps to ink to paper. Until next time, stamp on my friends.

Linda

#acardaday
#makeacardsendacard
#keepstamping

Posted in Any Occassion, Cards, Clearance Rack, Product Medley, Products | Tagged | Leave a comment